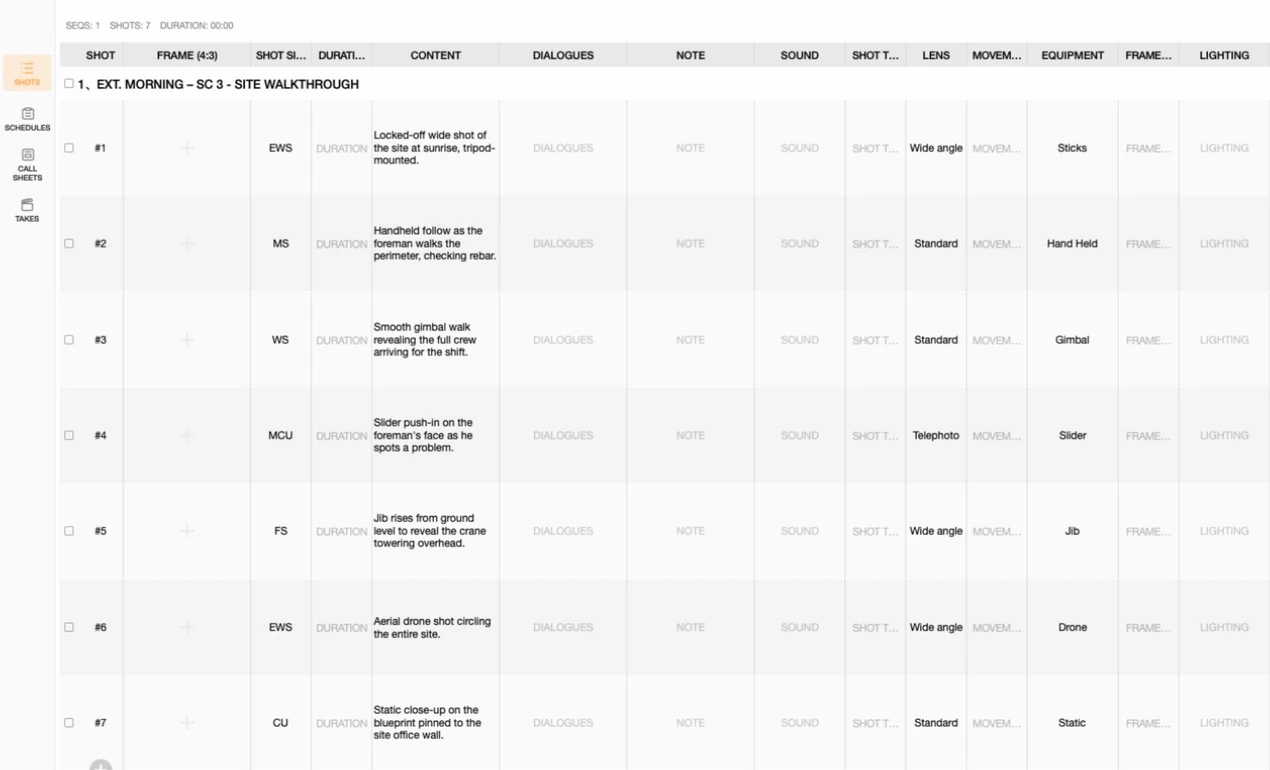
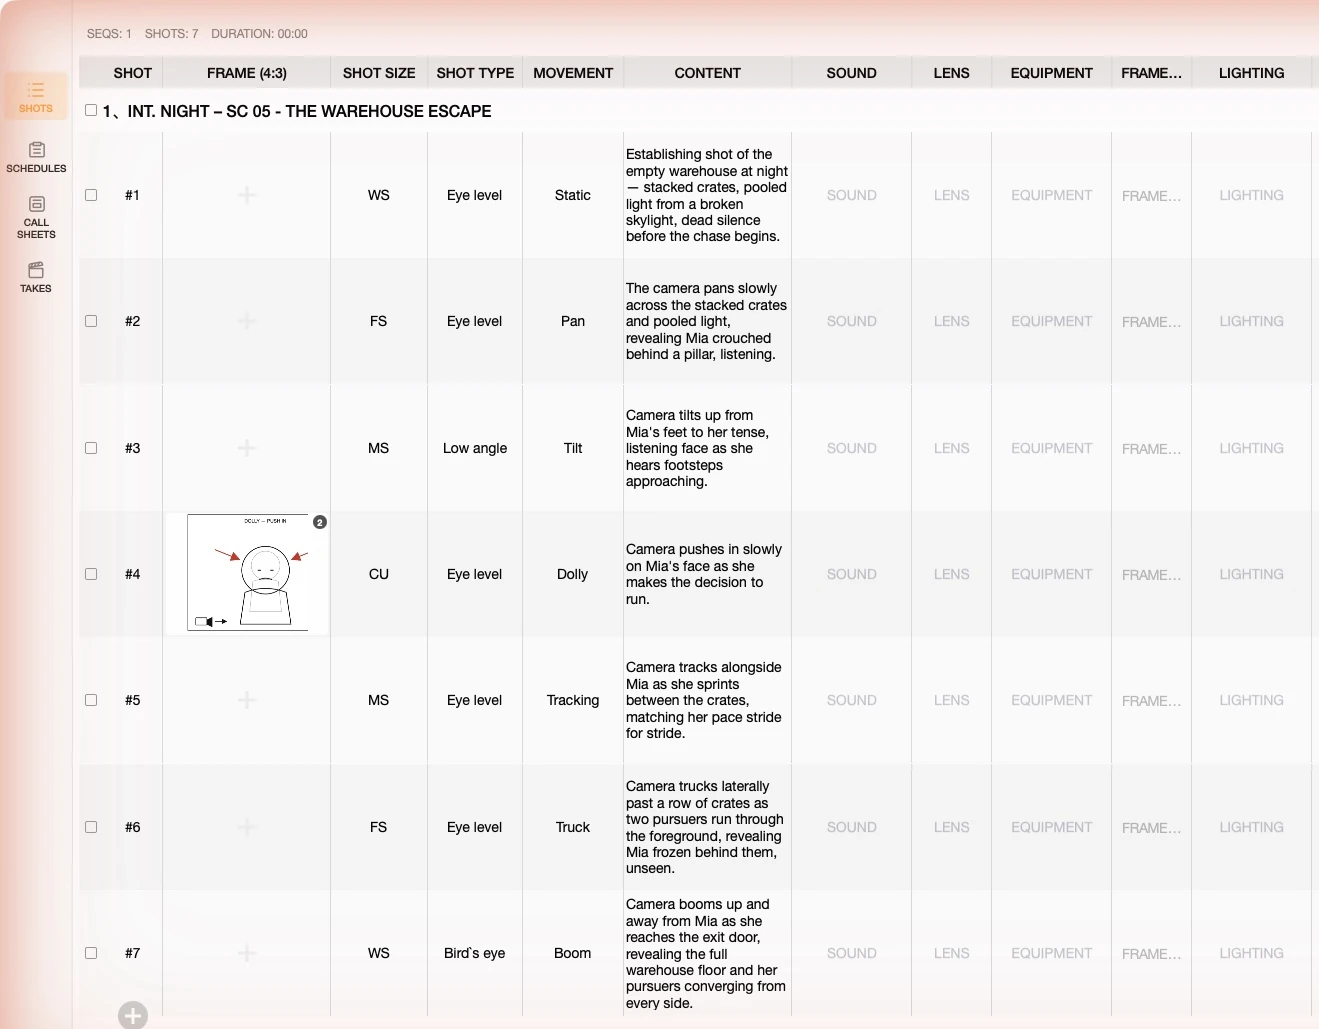
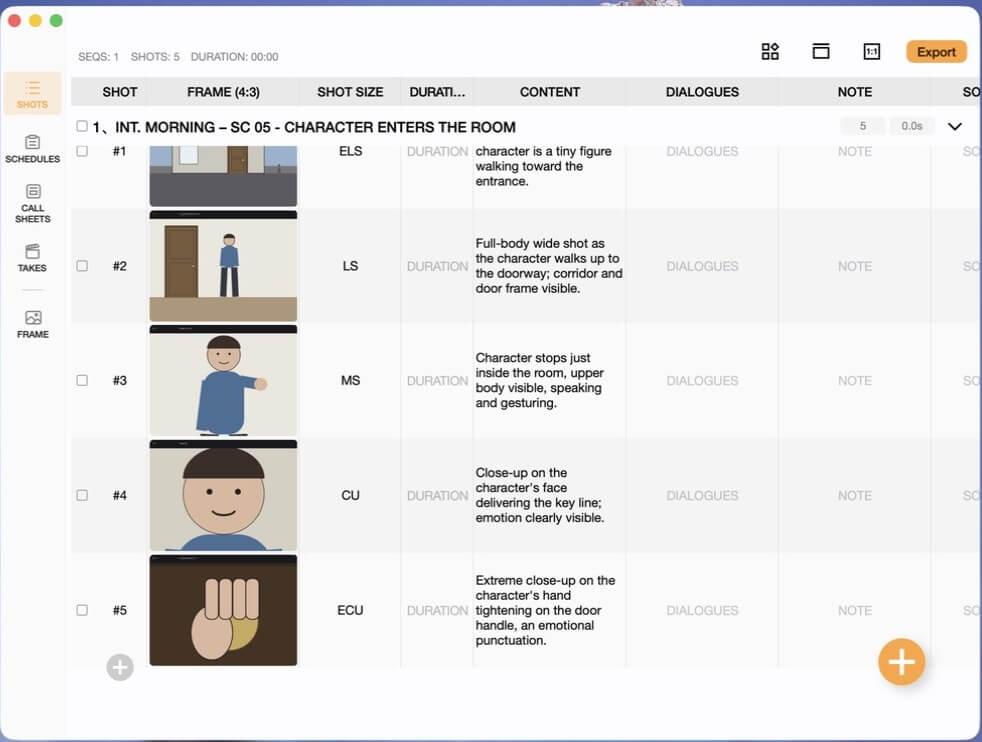
If shot size answers "how much of the subject the frame contains," shot type (also called camera angle) answers "whose position the audience is standing in, and from what vantage point they're watching." Same line of dialogue, same shot size — change the camera angle, and the emotion can flip entirely. This tutorial first covers the general knowledge, then shows you how to put it into practice inside Previs Shot's shot list.
1. What Is Shot Type?
Shot type (also called camera angle) describes the camera's position, height, and tilt relative to the subject, and whose gaze the frame represents. It's a separate axis from shot size: shot size decides "how full the frame is," shot type decides "from where, and on whose behalf."
The exact same close-up reads as a neutral statement at eye level, gains a sense of power when shot from a low angle, and can make a character look fragile when shot from a high angle. That difference is shot type.
One-line definition: Shot type = where the camera stands, and whose point of view it represents.
Why Shot Type Matters
Shot type isn't just a technical choice about where to mount the camera — it directly shapes the psychological relationship, power dynamic, and sense of identification between the audience and the characters:
- Establishing viewpoint and stance: shot type tells the audience whose position they're watching from — a bystander, a participant, or the character themselves.
- Signaling power: who's framed higher or lower often maps directly onto who holds control in that moment.
- Building or breaking immersion: a POV shot turns the audience into the character; a bird's eye view pulls them back out to observe.
- Conveying stability or imbalance: eye level feels grounded and neutral; a tilted frame signals tension, chaos, or psychological imbalance.
That's why planning "what shot type for each shot" matters just as much as planning "what shot size" — the two need to be designed together to tell a scene well.
2. Shot Type Categories, One by One
Below are nine of the most common shot types. To make comparison easy, we'll use one running example throughout:
Example scene: a confession that changes everything. Old friends A and B are having drinks in a private bar booth. A finally admits a truth to B that could upend their relationship. Let's see how the same conversation reads differently at each shot type.
Note: naming conventions for shot type vary slightly by region and production house (for example, whether "over-the-shoulder" and "two shot" belong to the same broader category). What follows reflects common industry usage — always confirm your team's own conventions.
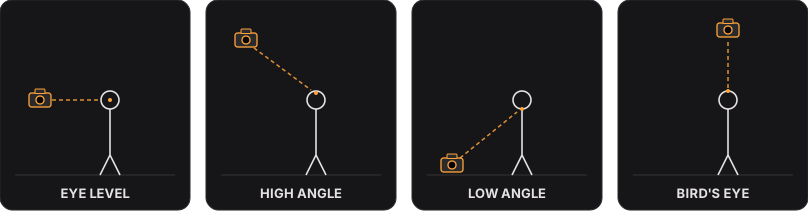
1. Eye Level
- Frame characteristics: the camera sits at the same height as the character's eyes, with no obvious upward or downward distortion.
- Camera position: level with the subject's line of sight, facing them directly or near-directly.
- Narrative role / emotion: a neutral, objective, equal viewpoint — the audience and the character stand on even footing, with no built-in judgment. The most "invisible" shot type.
- Example: A and B sit across the table from each other, chatting at eye level about how things have been — plain, grounded, and giving no hint of who has the upper hand.
- Typical uses: everyday dialogue, naturalistic scenes, openings that need to establish trust or neutrality.
2. High Angle
- Frame characteristics: the camera sits above the subject, shooting downward.
- Camera position: above the subject's eye line, anywhere from a slight tilt down to nearly vertical.
- Narrative role / emotion: makes a character look small, vulnerable, or overpowered — or can simply establish the wider scene.
- Example: the moment A finally speaks up, a high angle frames him looking exposed, with nowhere to hide.
- Typical uses: conveying vulnerability, fear, or being dominated; also used as an establishing transition for the space.
3. Low Angle
- Frame characteristics: the camera sits below the subject, shooting upward.
- Camera position: below the subject's eye line — the lower the angle, the larger and more imposing the character appears.
- Narrative role / emotion: gives a character power and authority, sometimes intimidation; often used to land a "power reversal."
- Example: B stands up abruptly after hearing the confession; a low angle makes him look furious and dominant, flipping the power balance in an instant.
- Typical uses: introducing authority figures or antagonists, power-reversal moments, shocking reveals.
4. Bird's Eye View / Overhead Shot
- Frame characteristics: the camera sits almost directly above the scene, reducing characters and setting to graphic, top-down shapes.
- Camera position: directly above the scene, close to vertical.
- Narrative role / emotion: creates strong detachment and a sense of watching from outside, sometimes a feeling of fate or inevitability; also useful for laying out spatial relationships.
- Example: after the confession lands, the shot cuts to an overhead view of the whole booth — A and B sitting at opposite ends like two pieces on a board, hinting their relationship has already been decided.
- Typical uses: scene transitions, passages with a sense of fate, showing spatial layout, montage transitions.
Note: high angle and bird's eye view are often blurred together. The simple distinction: a high angle still keeps some perspective and character detail, emphasizing a sense of being overpowered; a bird's eye view is nearly vertical, emphasizing detachment and graphic composition. Previs Shot lets you customize these labels to match your team's convention.
5. Over-the-Shoulder (OTS)
- Frame characteristics: the camera shoots from behind one character's shoulder, with the back of their head or shoulder in the foreground and the other character's face in the background.
- Camera position: close behind one character, angled slightly toward their conversation partner.
- Narrative role / emotion: establishes spatial relationship and eye-line direction between two people, letting the audience "sit in" for one character's side of the conversation.
- Example: shooting A's face as he reveals the secret from behind B's shoulder — the audience feels like they're sitting in B's seat, hearing the truth alongside him.
- Typical uses: the standard shot/reverse-shot setup for dialogue scenes, establishing the spatial and eye-line relationship between two speakers.
6. Point of View (POV)
- Frame characteristics: the camera directly represents a character's own eyes; that character isn't visible in frame (unless seen in a reflection).
- Camera position: at the exact vantage point of the character themselves.
- Narrative role / emotion: creates strong immersion and identification, letting the audience directly "become" the character and share their exact information.
- Example: cutting to A's POV, the frame shows exactly what he sees of B's expression right now — anger, shock, or silence — and the audience waits with him, holding its breath, for an answer.
- Typical uses: building suspense, emphasizing a character's observation or judgment, immersive experiences in horror or thriller genres.
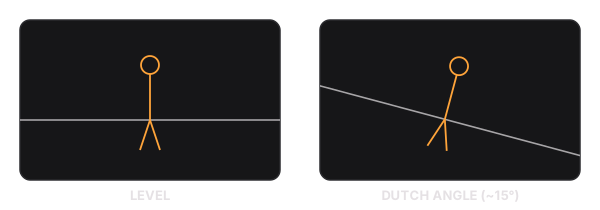
7. Dutch Angle / Canted Angle
- Frame characteristics: the camera is tilted along its lens axis, so the horizon line is no longer level.
- Camera position: the position itself may not change — what matters is the roll of the camera body around the lens axis.
- Narrative role / emotion: creates unease, imbalance, chaos, or tension, signaling to the audience that "something is off."
- Example: the moment B realizes how serious the secret is, the frame tilts slightly, visually conveying the way his world has just been knocked off-axis.
- Typical uses: moments of psychological imbalance, unexpected shocks, action or thriller sequences, unconventional narrative passages.
8. Two Shot
- Frame characteristics: two characters share the same frame, typically at a medium or full shot size.
- Camera position: in front of or at a slight angle to both characters, with both faces and postures visible at once.
- Narrative role / emotion: emphasizes the relationship between the two people themselves — intimacy, opposition, or complicity — rather than favoring either individual's point of view.
- Example: before the confession, a two shot frames A and B together, letting the audience feel their existing rapport, or the tension already simmering beneath it.
- Typical uses: establishing a relationship, confrontation scenes, ensemble interaction, avoiding overly frequent cuts between shot/reverse-shot.
9. Insert Shot
- Frame characteristics: breaks away from the main action line to close in on an object or detail — not necessarily a person — often independent of either character's coverage.
- Camera position: close to the detail being emphasized, unconstrained by either character's camera setup.
- Narrative role / emotion: highlights a key detail's significance to the plot, or supplies information the audience needs, creating a rhythmic pause.
- Example: cutting to a close-up of B's trembling hand setting down his glass — no line of dialogue needed to silently underline the impact of the confession.
- Typical uses: emphasizing a key prop or detail, supplying narrative information, giving a tense conversation room to breathe.
3. Quick Reference Table
| Shot Type | Abbreviation / Aliases | Camera Position | Primary Role |
|---|---|---|---|
| Eye Level | — | Level with subject's eye line | Neutral, objective |
| High Angle | — | Above subject, shooting down | Vulnerability, being overpowered |
| Low Angle | — | Below subject, shooting up | Power, authority |
| Bird's Eye View / Overhead | — | Directly above, near-vertical | Detachment, fate, spatial layout |
| Over-the-Shoulder | OTS | Behind one character, toward the other | Spatial and eye-line relationship |
| Point of View | POV | At the character's own vantage point | Immersion, identification |
| Dutch Angle / Canted Angle | Dutch Angle | Camera tilted on its axis | Unease, imbalance |
| Two Shot | — | Both characters in frame | Emphasizing the relationship |
| Insert Shot | Insert | Close on an object / detail | Emphasis, added information |
4. Working with Shot Type in Previs Shot
Once you understand shot types, the next step is to build them into your shot list. Previs Shot's core SHOTS view is designed exactly for this: break a scene down shot by shot, and specify shot size, shot type, movement, and a visual frame for each one.
4.1 Setting the SHOT TYPE Field
In the SHOTS view, each scene (Sequence) contains a series of shots (Shot rows). Every row has a set of columns, including a SHOT TYPE column sitting right next to SHOT SIZE.
Steps:
- Open Previs Shot and go to the SHOTS view.
- Select or create a sequence, then add the shot rows you need.
- Click the SHOT TYPE cell on the target row.
- Type the shot type directly (e.g. "Eye Level," "High Angle," "Low Angle," "OTS," "POV," "Dutch Angle," or your team's own wording).
Like SHOT SIZE, the SHOT TYPE field in Previs Shot is free text, so you can standardize on English terms (Eye Level / High Angle / Low Angle / Bird's Eye / OTS / POV / Dutch Angle / Two Shot / Insert) or your own naming convention. Whichever you choose, keep it consistent across the whole project — the same shot type shouldn't show up under different labels from shot to shot.
4.2 Pairing Shot Type with Neighboring Fields
Shot type rarely stands alone — combined with these fields, it fully defines a shot's visual language:
- SHOT SIZE: the same over-the-shoulder setup can be a medium OTS or a close-up OTS — the tighter the size, the more it emphasizes the listener's reaction.
- MOVEMENT: shot type + movement together define the shot's dynamics — "low angle + slow push in" keeps building a character's sense of power, while "low angle + static" is more restrained.
- FRAME (storyboard image): draw the tilt of the horizon and the angle of the shot accurately in FRAME — especially for Dutch angles — so the SHOT TYPE label and the composition stay in sync, and the team can read the intended camera angle at a glance.
Recommended workflow: set the SHOT TYPE and SHOT SIZE text first, then draw or import the matching FRAME image — so you never end up with a shot labeled "low angle" but drawn as a high angle.
4.3 Planning a "Reversal Scene" Sequence by Shot Type
A scene is rarely shot at a single angle — it's a combination of shot types. Arranging different shot types row by row within a sequence in the SHOTS view is, in effect, designing how the relationship between audience and character shifts over the course of the scene.
For a "reversal scene," a common and effective pattern is: open with a two shot or over-the-shoulder to establish a calm, balanced conversation; cut to a shot type with strong emotional charge (low angle, high angle, or Dutch angle) right as the secret lands, to mark a shift in power or psychology; use an insert or POV shot to reinforce the impact; and, if needed, close on a bird's eye view to suggest the relationship has now been settled.
4.4 Worked Example: a "Reversal Scene" Camera Plan in Previs Shot
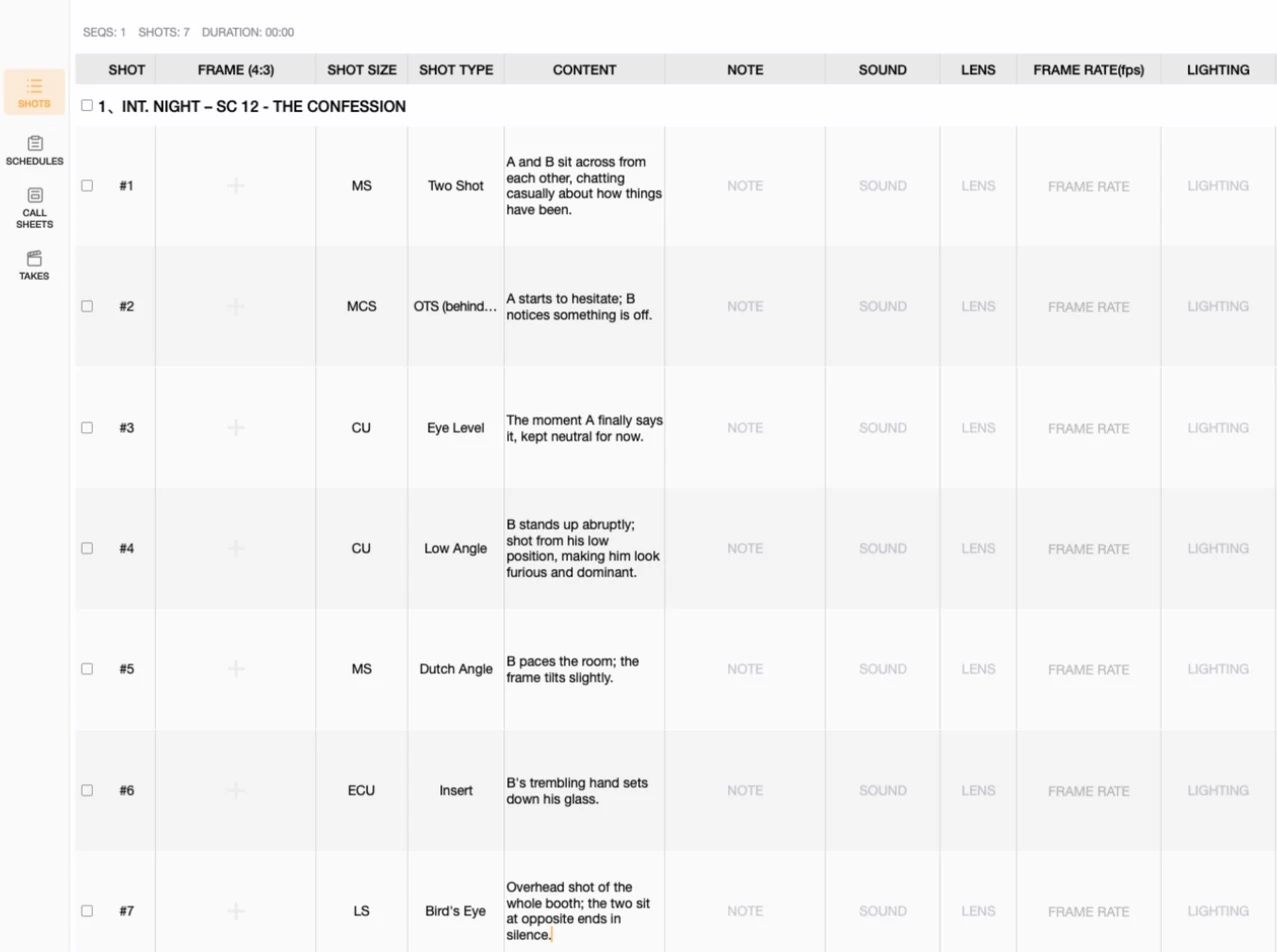
To build this tutorial, we created a demo project in Previs Shot named "Shot Type Basics Demo," with a sequence titled "SC 12 - The Confession" (INT. Night, Location: Bar Private Room). Here's the exact shot list we built, using the same running example — A admitting a truth to B that could upend their relationship:
| Shot # | SHOT TYPE | SHOT SIZE | Content | Notes |
|---|---|---|---|---|
| #1 | Two Shot | MS | A and B sit across from each other, chatting casually about how things have been. | Establishes relationship |
| #2 | OTS (from behind B, toward A) | MCS | A starts to hesitate; B notices something is off. | Setup, eye-line relationship |
| #3 | Eye Level | CU | The moment A finally says it, kept neutral for now. | Information lands |
| #4 | Low Angle | CU | B stands up abruptly; shot from his low position, making him look furious and dominant. | Power reversal |
| #5 | Dutch Angle | MS | B paces the room; the frame tilts slightly. | Psychological imbalance |
| #6 | Insert | ECU | B's trembling hand sets down his glass. | Silently underlines the impact |
| #7 | Bird's Eye | LS | Overhead shot of the whole booth; the two sit at opposite ends in silence. | Closing beat, relationship has shifted |
Building this in Previs Shot, step by step:
- In the SHOTS view, create a new sequence and rename it to describe the scene (we used "SC 12 - The Confession", with Location set to "Bar Private Room").
- Add seven shot rows. In each row's SHOT TYPE column, type Two Shot → OTS → Eye Level → Low Angle → Dutch Angle → Insert → Bird's Eye in order, and fill in the matching SHOT SIZE for each row as shown above.
- Fill in the CONTENT column for each row with a short description of the action and the emotional turn, as shown in the table above.
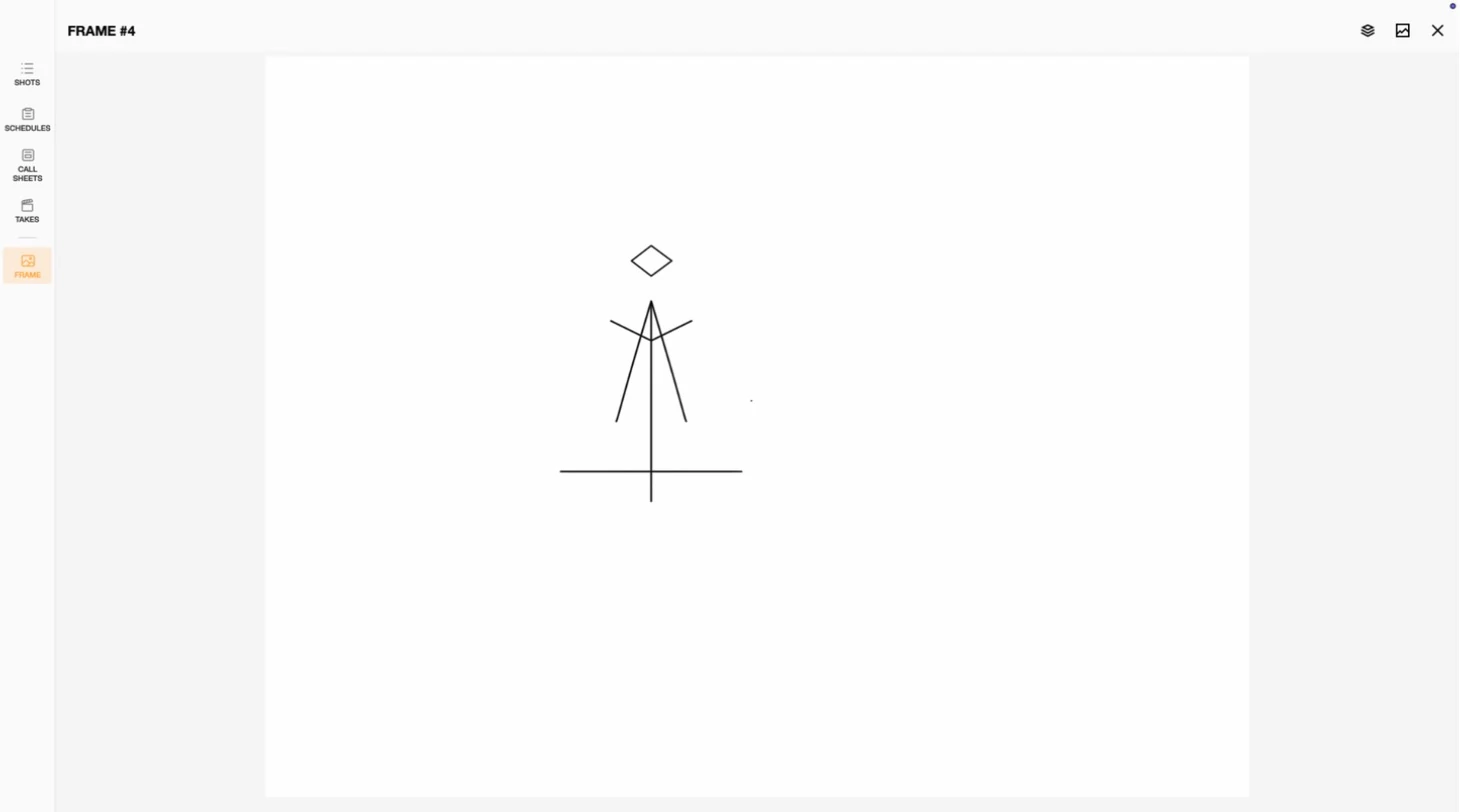
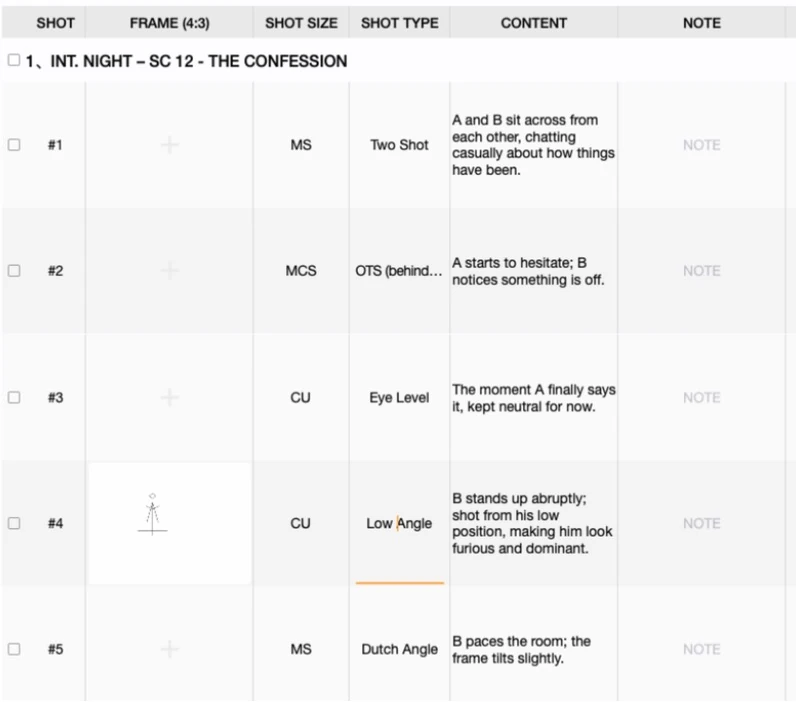
- Open each shot's FRAME and sketch or import a reference matching that shot type — pay particular attention to the upward perspective on row 4 and the tilt of the horizon on row 5, so the sketch matches the label.
- Once complete, the sequence becomes a visual plan that clearly shows how the point of view shifts, and how the power balance flips.
Below are actual screenshots from this demo project inside Previs Shot:
4.5 Fitting Into the Full Production Workflow
Planning shot type in SHOTS is just the first step. Previs Shot's typical workflow carries that information all the way to set:
SHOTS → SCHEDULES → CALL SHEETS → TAKES
- SHOTS: define shot size, shot type, movement, and frame for every shot.
- SCHEDULES: place shots into the shooting schedule.
- CALL SHEETS: generate call sheets so the whole crew knows what angle and shot size is being shot each day.
- TAKES: log each shot's takes on set.
A shot list with clearly planned shot types makes scheduling more efficient (shots sharing the same angle and lighting setup can be grouped together) and helps the director and DP stay aligned on visual intent on set.
5. Tips for Beginners
- Decide whose position the audience is standing in first: bystander, participant, or the character themselves — once that's clear, the right shot type usually becomes obvious.
- Never design shot type in isolation: always plan it alongside shot size and movement — together, the three define a shot's complete visual language.
- Extreme angles are punctuation, not a default: the more often you use low angle, high angle, Dutch angle, or bird's eye view, the weaker their emotional impact — save them for the moments that matter most.
- Master OTS and two shots first: they're the workhorse combination for dialogue scenes; build fluency there before reaching for more dramatic angles.
- Break down scenes from films you love: notice which shot type the director switches to at each emotional turn — it's the fastest way to build an intuitive feel for camera angle.
This tutorial is part of the Previs Shot tutorial series. Mastering shot type lets your shot list explain not just what you're shooting, but whose point of view you're shooting it from.