A shot list tells your crew what to shoot. A call sheet tells them where to be, when, and who else is showing up. This tutorial covers the CALL SHEETS view in Previs Shot: what belongs on one, the fastest way to fill it in without retyping anything, and how to hand the finished document to your crew.
1. What a Call Sheet Actually Is
A call sheet is a single-day document: who's working, what time they're called, where they need to be, what's being shot, and what the weather looks like. It's not the shot list itself — it's the logistics wrapper around one shooting day, built from data that mostly already exists elsewhere in your project.
2. Where It Lives
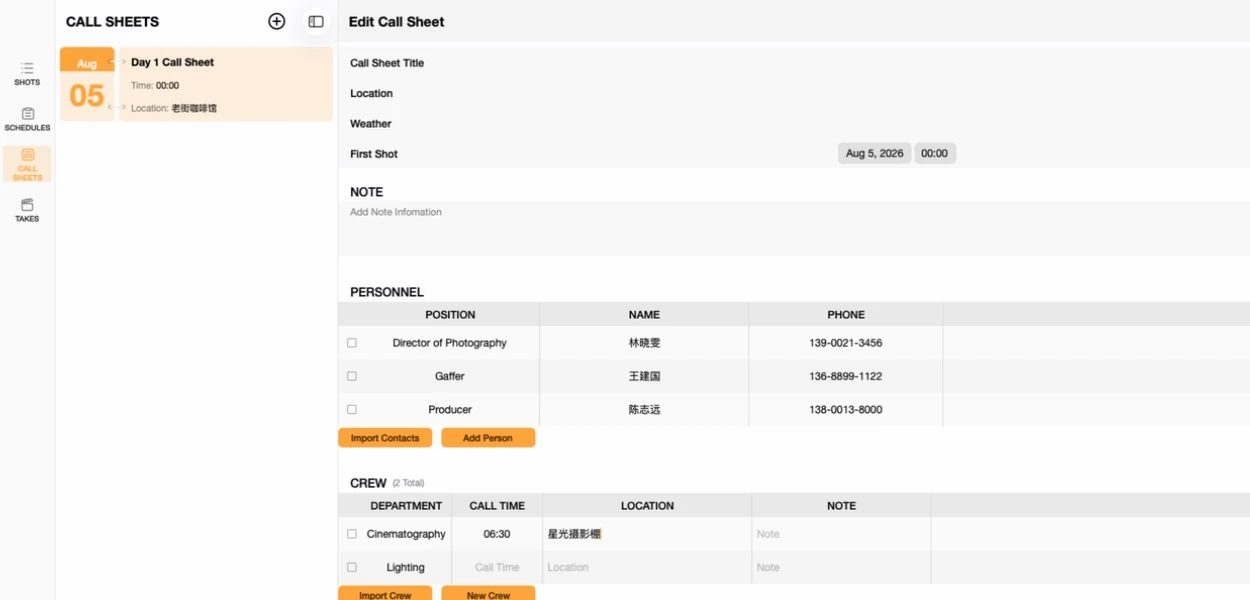
The CALL SHEETS tab sits in the same sidebar as SHOTS, SCHEDULES and TAKES. Each entry is dated and tied to one shooting day — click + to start a new one, or open an existing card to edit it.
3. Filling In the Basics
At the top of a call sheet: Title, Location, Weather, First Shot (the call time everything else is built around), and a free-text Note. Below that, the sheet is organized into sections — Personnel, Crew, Client, Talent, Schedules and Location.
4. Import vs. Add — the Choice That Actually Matters
Every section offers two buttons: an orange Import… button and a plain Add/New… button. They look similar but behave very differently:
- Import Contacts / Import Crew / Import Schedules pulls rows from data that already exists — your shared contacts, departments, or this project's shooting schedule — and keeps them linked to that source. Update a contact's phone number later, and every call sheet that imported them updates too.
- Add Person / New Crew / New Talent / New Schedule creates a row that only exists on this call sheet, with no connection to anything else. Fine for a one-off name you'll never need again; a dead end if that person works on more than one shoot day.
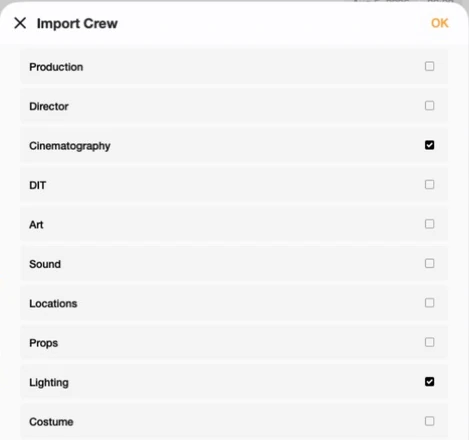
Import Crew works a little differently from the others: instead of picking individual people, you pick whole departments, and Previs Shot adds one row per department for you to assign a name, call time and location to.
Import Schedules is what actually connects a call sheet to your shooting day: pick a schedule entry and its scene number, location, INT/EXT and time-of-day come across automatically, followed by the full shot breakdown underneath.
5. Editing a Row
Every cell in every section edits the same way as the SHOTS table: click in, type, click away. Call time and location are the two fields you'll touch most — set a department's call time 30 minutes before the first shot's call time for anyone who needs to prep or light before camera's ready.
6. Exporting the Finished Sheet
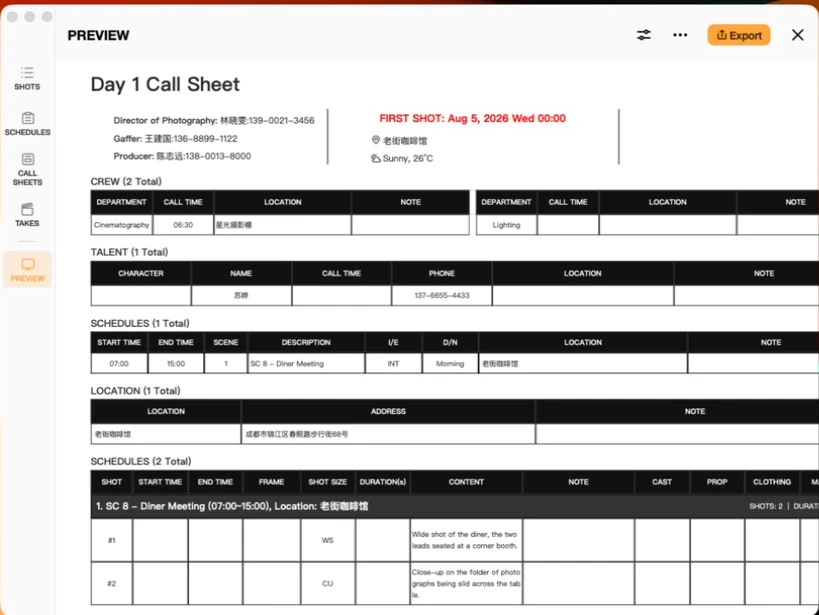
Click Export in the top-right corner to open a full print preview — the same information, laid out as a document your crew can actually read, with every section stacked in order and the day's shot breakdown at the bottom.
7. A Few Practical Notes
- One call sheet per shooting day. If your schedule has three shooting days, you'll typically create three call sheets, each importing that day's schedule entry.
- Import first, edit second. Bring in whatever already exists — contacts, departments, the day's schedule — before typing anything by hand. It's faster and it stays current automatically.
- A department with no name yet is still worth adding. Importing "Cinematography" as a placeholder row reminds you a DP is needed for that day, even before you've cast one.
This tutorial is part of the Previs Shot tutorial series. Call sheets draw their crew and locations from the same shared directory covered in our Crew Directory Basics tutorial, and their schedule rows from the shooting days covered in Shooting Plan Basics.